Control Plane Connector
This feature is available in the Standard Plan and above. For more information, see our pricing plans or contact our sales team.
This guide applies to all supported versions (v1.9-v1.14+). Control Plane Connector functionality is consistent across versions.
For related API specifications and resources, see the Spaces API Reference. version compatibility details, see the .
Control Plane Connector connects arbitrary Kubernetes application clusters outside the Upbound Spaces to your control planes running in Upbound Spaces. This lets you interact with your control plane's API from the app cluster. The claim APIs and the namespaced XR APIs you define via CompositeResourceDefinitions (XRDs) in the control plane, are available in your app cluster alongside Kubernetes workload APIs like Pod. Control Plane Connector enables the same experience as a locally installed Crossplane.
Control Plane Connector operations
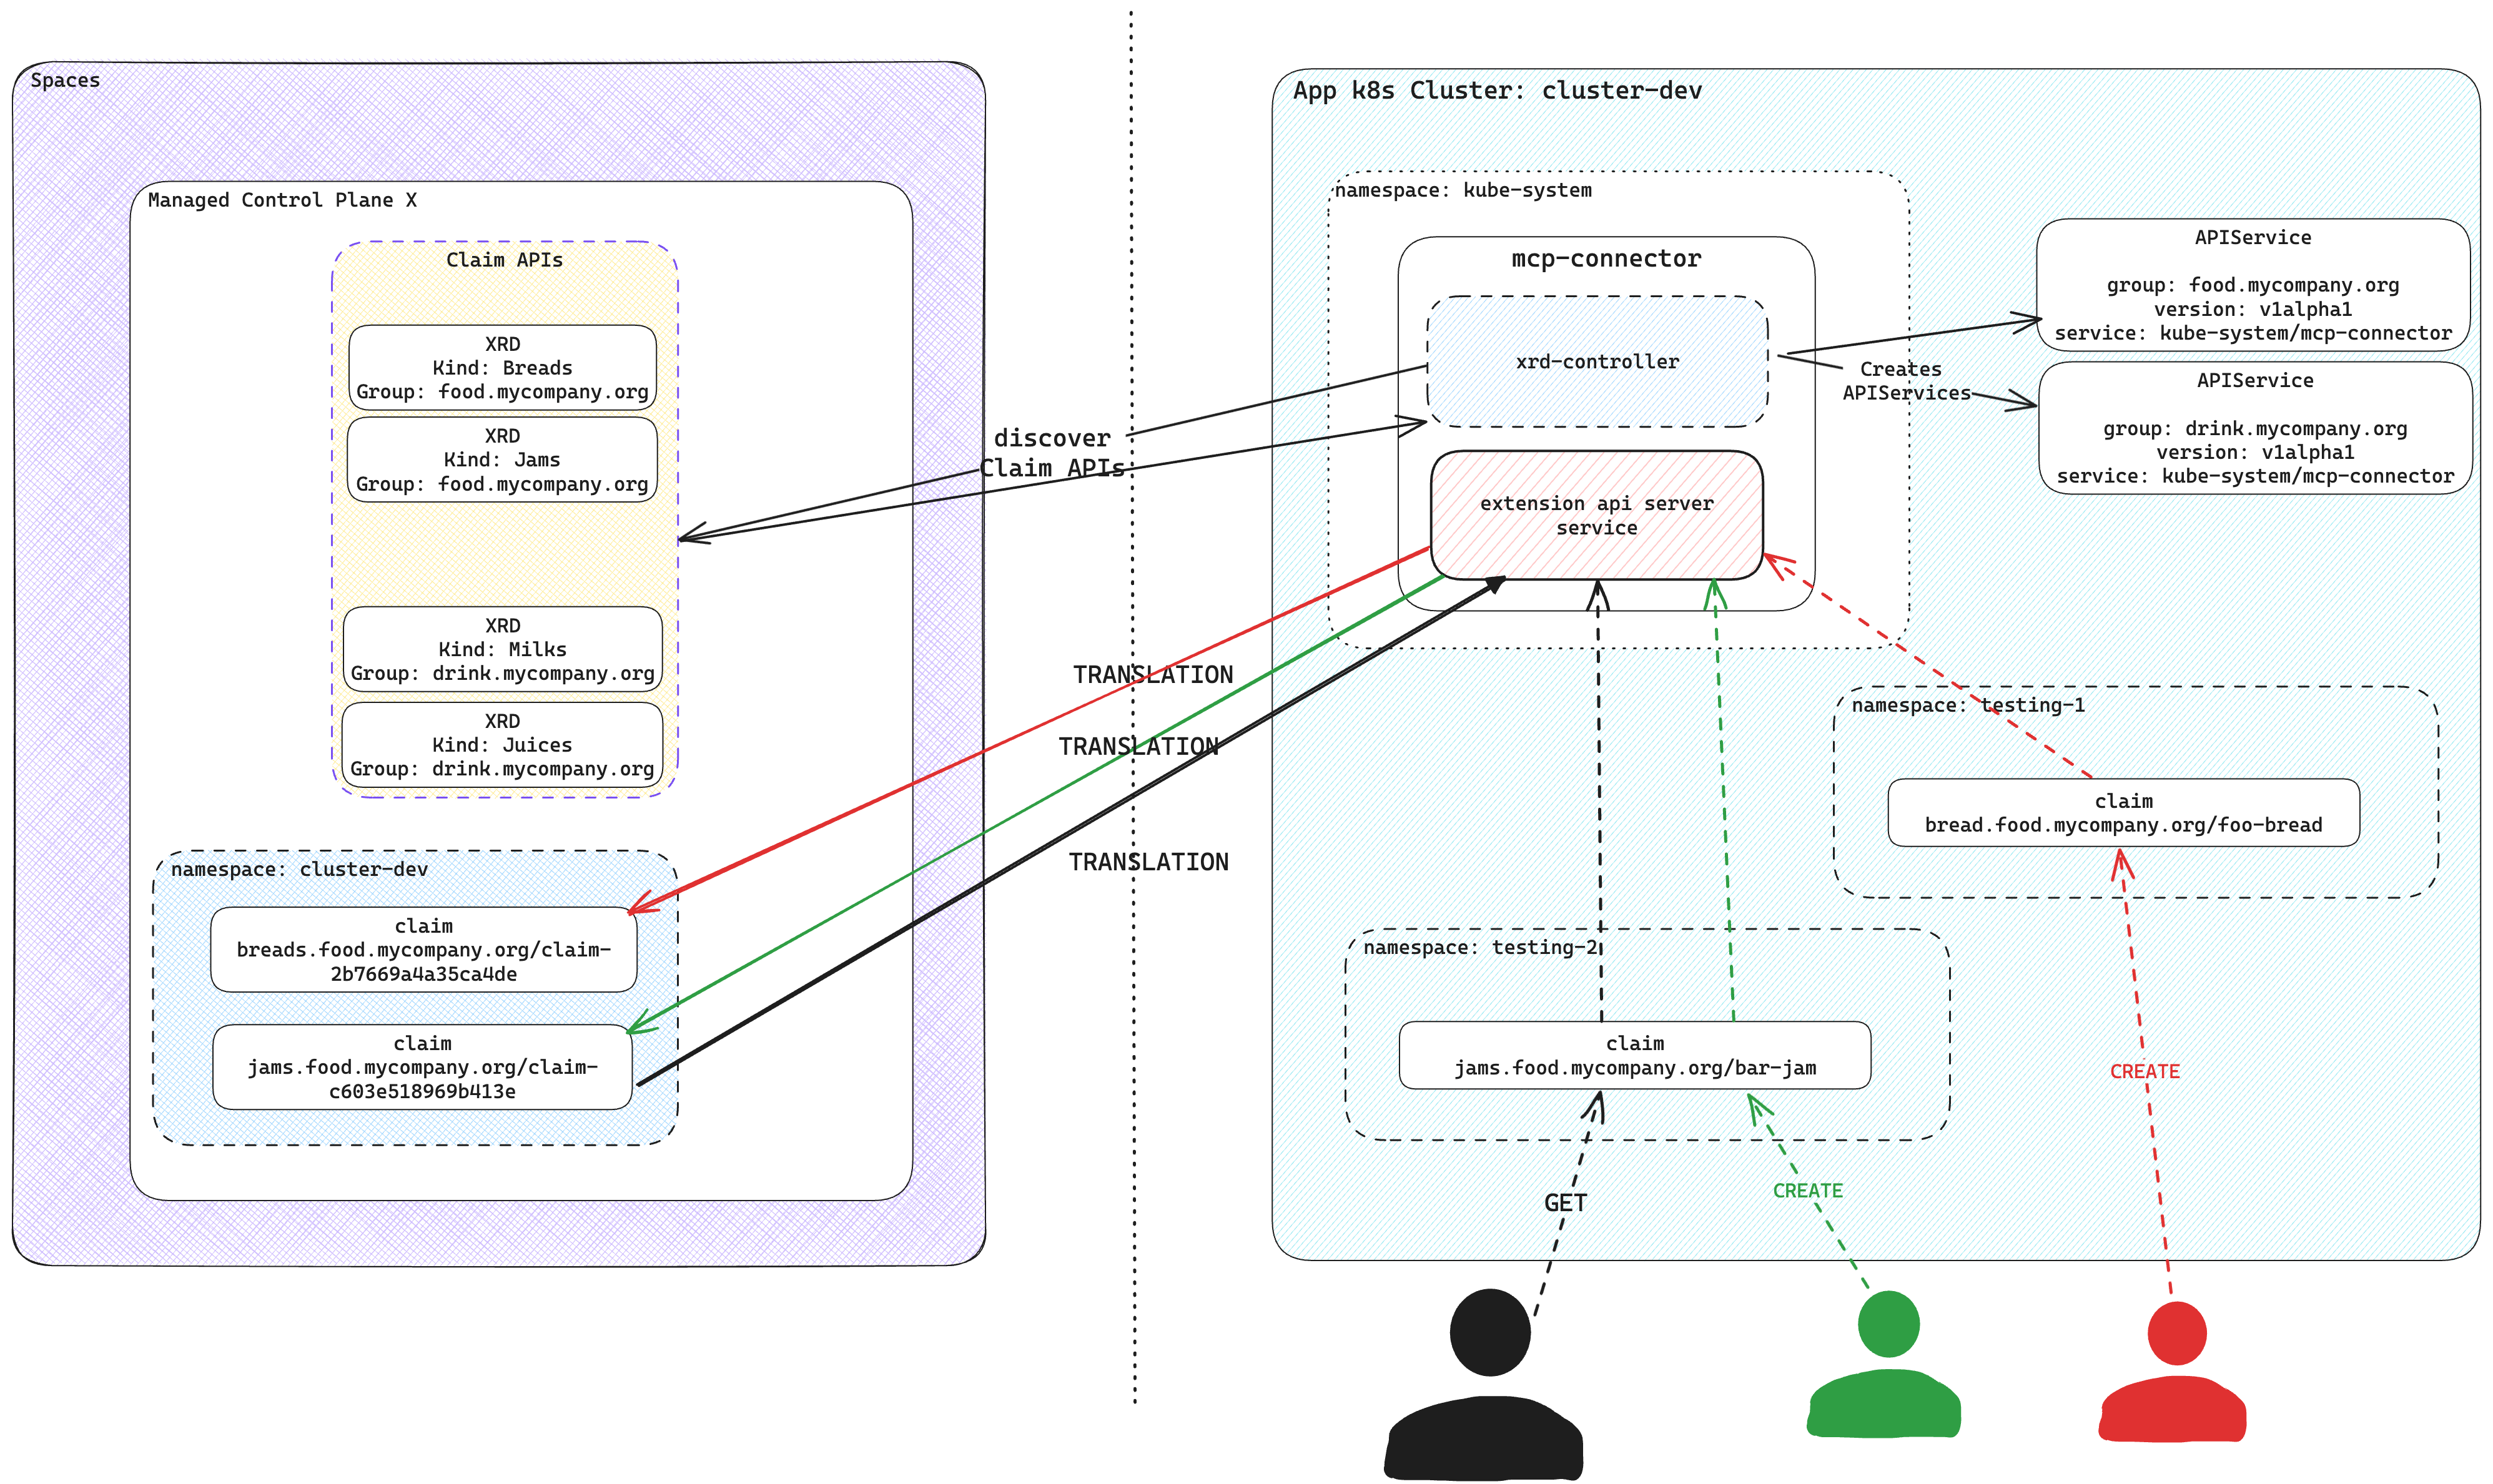
Control Plane Connector leverages the Kubernetes API AggregationLayer to create an extension API server and serve the claim APIs and the namespaced XR APIs in the control plane. It discovers the claim APIs and the namespaced XR APIs available in the control plane and registers corresponding APIService resources on the app cluster. Those APIService resources refer to the extension API server of Control Plane Connector.
The claim APIs and the namespaced XR APIs are available in your Kubernetes cluster, just like all native Kubernetes APIs.
The Control Plane Connector processes every request targeting the claim APIs and the namespaced XR APIs and makes the relevant requests to the connected control plane.
Only the connected control plane stores and processes all claims and namespaced XRs created in the app cluster, eliminating any storage use at the application cluster. The control plane connector provisions a target namespace at the control plane for the app cluster and stores all claims and namespaced XRs in this target namespace.
For managing the claims and namespaced XRs, the Control Plane Connector creates a unique identifier for a resource by combining input parameters from claims, including:
metadata.namemetadata.namespaceyour cluster name
It employs SHA-256 hashing to generate a hash value and then extracts the first 16 characters of that hash. This ensures the resulting identifier remains within the 64-character limit in Kubernetes.
For instance, if a claim named my-bucket exists in the test namespace in
cluster-dev, the system calculates the SHA-256 hash from
my-bucket-x-test-x-00000000-0000-0000-0000-000000000000 and takes the first 16
characters. The control plane side then names the claim claim-c603e518969b413e.
For namespaced XRs, the process is similar, only the prefix is different.
The name becomes nxr-c603e518969b413e.
Installation
- up CLI
- Helm
Log in with the up CLI:
up login
Connect your app cluster to a namespace in an Upbound control plane with up controlplane connector install <control-plane-name> <namespace-to-sync-to>. This command creates a user token and installs the Control Plane Connector to your cluster. It's recommended you create a values file called connector-values.yaml and provide the following below. Select the tab according to which environment your control plane is running in.
- Cloud and Connected Spaces
- Disconnected Spaces
upbound:
  # This is your org account in Upbound e.g. the name displayed after executing `up org list`
  account: <ORG_ACCOUNT>
  # This is a personal access token generated in the Upbound Console
  token: <PERSONAL_ACCESS_TOKEN>

spaces:
  # If your control plane is running in Upbound's GCP Cloud Space, else use upbound-aws-us-east-1.spaces.upbound.io
  host: "upbound-gcp-us-west-1.spaces.upbound.io"
  insecureSkipTLSVerify: true
  controlPlane:
    # The name of the control plane you want the Connector to attach to
    name: <CONTROL_PLANE_NAME>
    # The control plane group the control plane resides in
    group: <CONTROL_PLANE_GROUP>
    # The namespace within the control plane to sync claims from the app cluster to. NOTE: This must be created before you install the connector.
    claimNamespace: <NAMESPACE_TO_SYNC_TO>
- Create a kubeconfig for the control plane. Update your Upbound context to the path for your desired control plane.
up login
up ctx <your-org>/upbound-gcp-us-central-1/default/your-control-plane
up ctx . -f - > context.yaml
- Write it to a secret in the cluster where you plan to install the Control Plane Connector to.
kubectl create secret generic my-controlplane-kubeconfig --from-file=context.yaml
- Reference this secret in the
spaces.controlPlane.kubeconfigSecretfield below.
spaces:
  controlPlane:
    # The namespace within the control plane to sync claims from the app cluster to. NOTE: This must be created before you install the connector.
    claimNamespace: <NAMESPACE_TO_SYNC_TO>
    kubeconfigSecret:
      name: my-controlplane-kubeconfig
      key: kubeconfig
Provide the values file above when you run the CLI command:
up controlplane connector install my-control-plane my-app-ns-1 --file=connector-values.yaml
The Claim APIs and the namespaced XR APIs from your control plane are now visible in the cluster.
You can verify this with kubectl api-resources.
kubectl api-resources
Uninstall
Disconnect an app cluster that you prior installed the Control Plane Connector on by running the following:
up ctp connector uninstall <namespace>
This command uninstalls the helm chart for the Control Plane Connector from an app cluster. It moves any claims in the app cluster into the control plane at the specified namespace.
Make sure your kubeconfig's current context is pointed at the app cluster where you want to uninstall Control Plane Connector from.
It's recommended you create a values file called connector-values.yaml and
provide the following below. Select the tab according to which environment your
control plane is running in.
- Cloud and Connected Spaces
- Disconnected Spaces
upbound:
  # This is your org account in Upbound e.g. the name displayed after executing `up org list`
  account: <ORG_ACCOUNT>
  # This is a personal access token generated in the Upbound Console
  token: <PERSONAL_ACCESS_TOKEN>

spaces:
  # Upbound GCP US-West-1     upbound-gcp-us-west-1.spaces.upbound.io
  # Upbound AWS US-East-1     upbound-aws-us-east-1.spaces.upbound.io
  # Upbound GCP US-Central-1  upbound-gcp-us-central-1.spaces.upbound.io
  host: "<Upbound Space Region>"
  insecureSkipTLSVerify: true
  controlPlane:
    # The name of the control plane you want the Connector to attach to
    name: <CONTROL_PLANE_NAME>
    # The control plane group the control plane resides in
    group: <CONTROL_PLANE_GROUP>
    # The namespace within the control plane to sync claims from the app cluster to.
    # NOTE: This must be created before you install the connector.
    claimNamespace: <NAMESPACE_TO_SYNC_TO>
Create a kubeconfig for the
control plane. Write it to a secret in the cluster where you plan to
install the Control Plane Connector to. Reference this secret in the
spaces.controlPlane.kubeconfigSecret field below.
spaces:
  controlPlane:
    # The namespace within the control plane to sync claims from the app cluster to. NOTE: This must be created before you install the connector.
    claimNamespace: <NAMESPACE_TO_SYNC_TO>
    kubeconfigSecret:
      name: my-controlplane-kubeconfig
      key: kubeconfig
Provide the values file above when you helm install the Control Plane Connector:
helm install --wait mcp-connector oci://xpkg.upbound.io/spaces-artifacts/mcp-connector -n kube-system -f connector-values.yaml
Create an API token from the Upbound user account settings page in the console by following these instructions.
Uninstall
You can uninstall Control Plane Connector with Helm by running the following:
helm uninstall mcp-connector
Example usage
This example creates a control plane using Configuration
EKS. KubernetesCluster is
available as a claim API in your control plane. The following is an
example
object you can create in your control plane.
apiVersion: k8s.starter.org/v1alpha1
kind: KubernetesCluster
metadata:
  name: my-cluster
  namespace: default
spec:
  id: my-cluster
  parameters:
    nodes:
      count: 3
      size: small
    services:
      operators:
        prometheus:
          version: "34.5.1"
  writeConnectionSecretToRef:
    name: my-cluster-kubeconfig
After connecting your Kubernetes app cluster to the control plane, you
can create the KubernetesCluster object in your app cluster. Although your
local cluster has an Object, the actual resources is in your managed control
plane inside Upbound.
# Applying the claim YAML above.
# kubectl is set up to talk with your Kubernetes cluster.
kubectl apply -f claim.yaml


kubectl get claim -A
NAME          SYNCED   READY   CONNECTION-SECRET       AGE
my-cluster    True     True    my-cluster-kubeconfig   2m
Once Kubernetes creates the object, view the console to see your object.
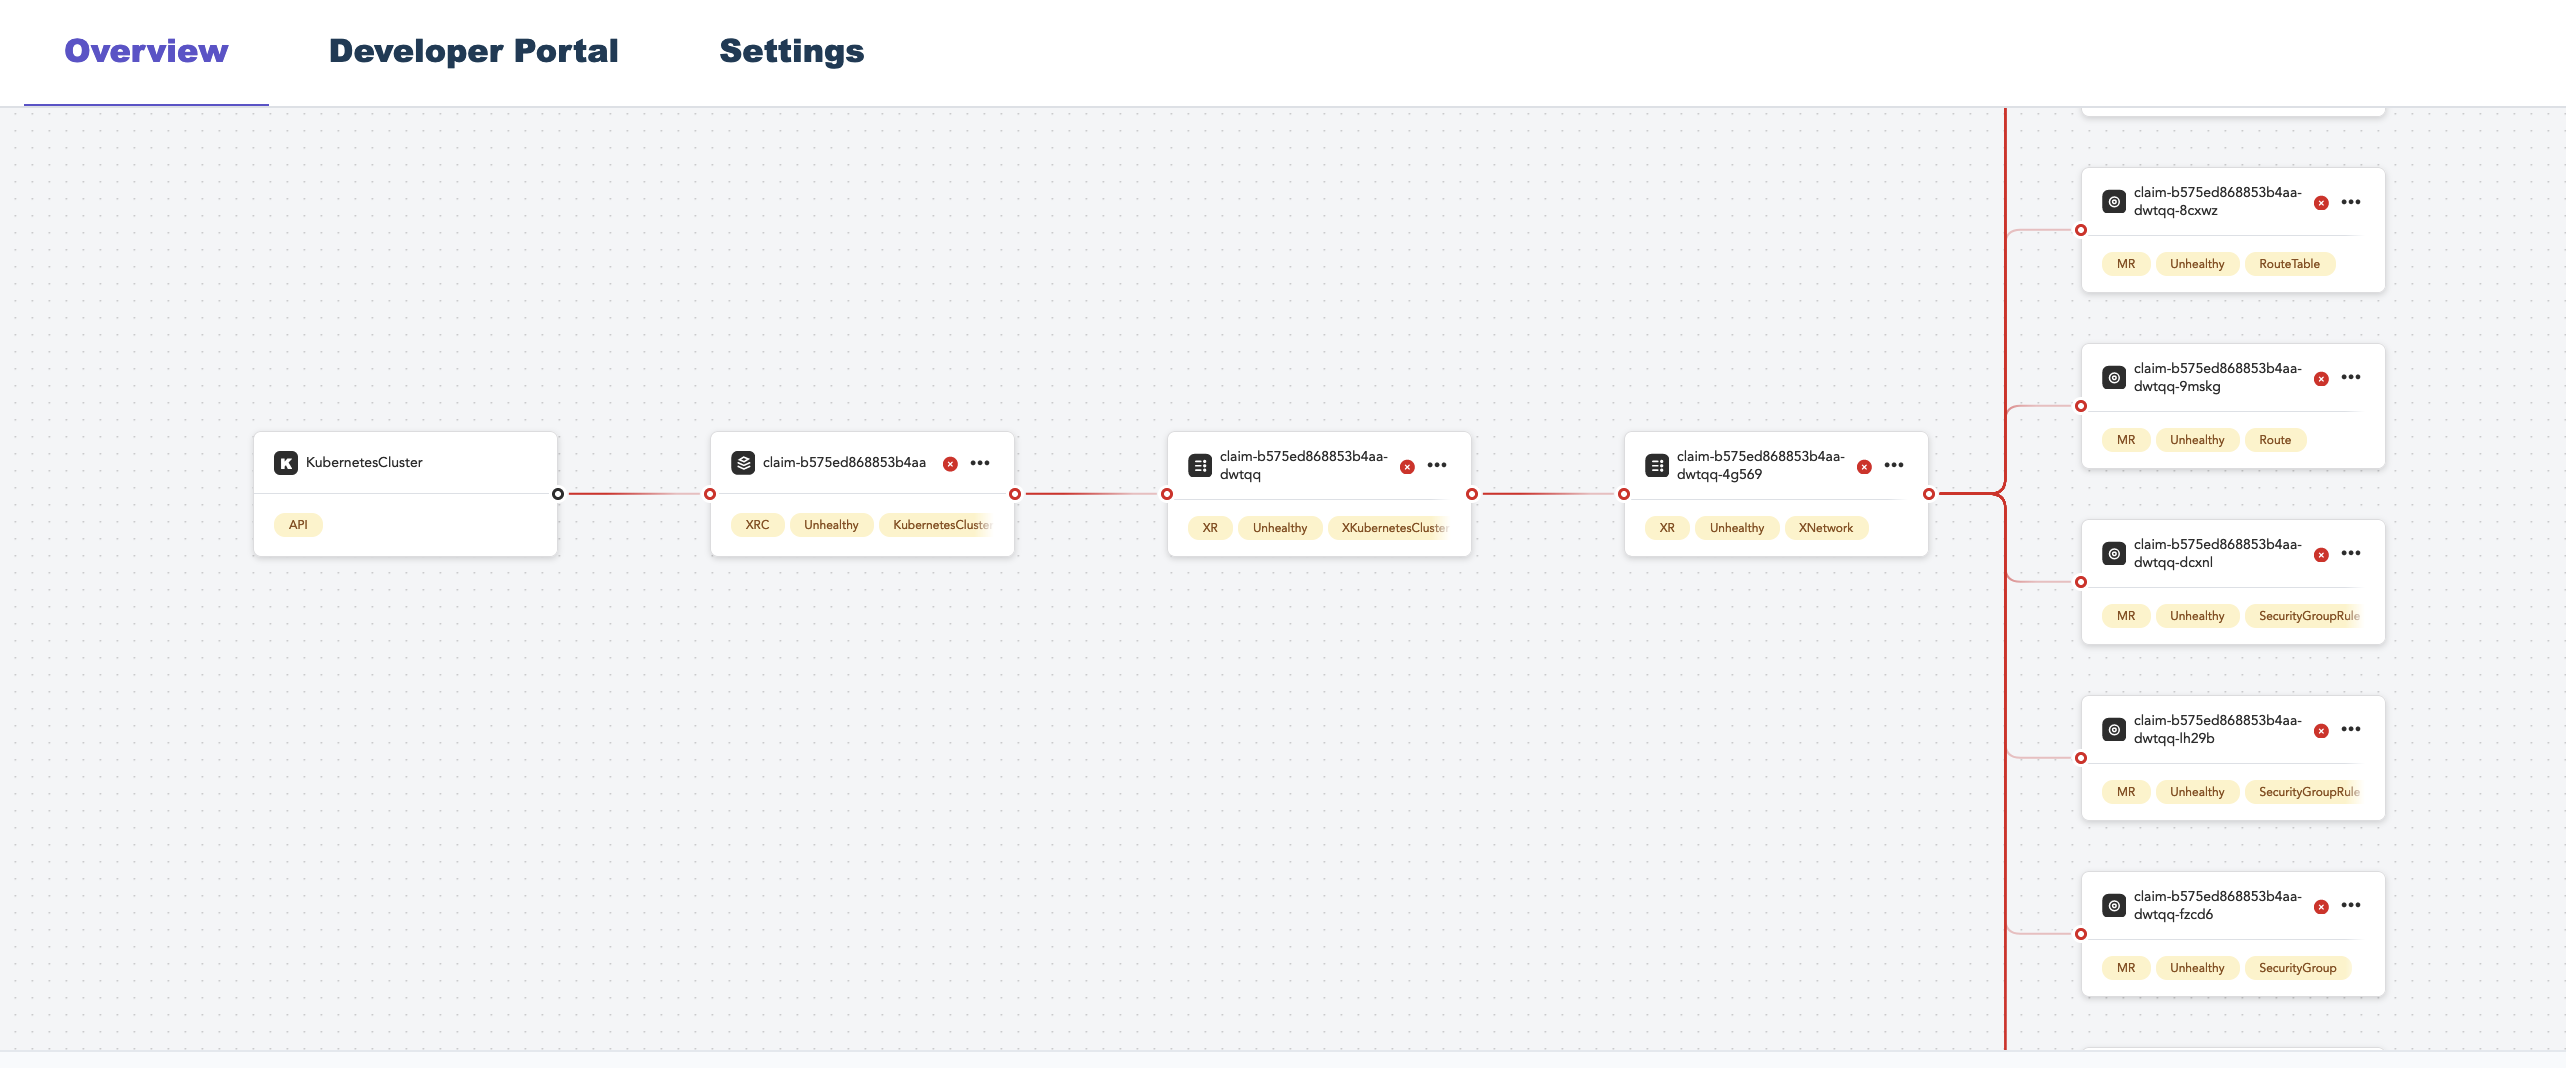
You can interact with the object through your cluster just as if it lives in your cluster.
Migration to control planes
This guide details the migration of a Crossplane installation to Upbound-managed control planes using the Control Plane Connector to manage claims on an application cluster.
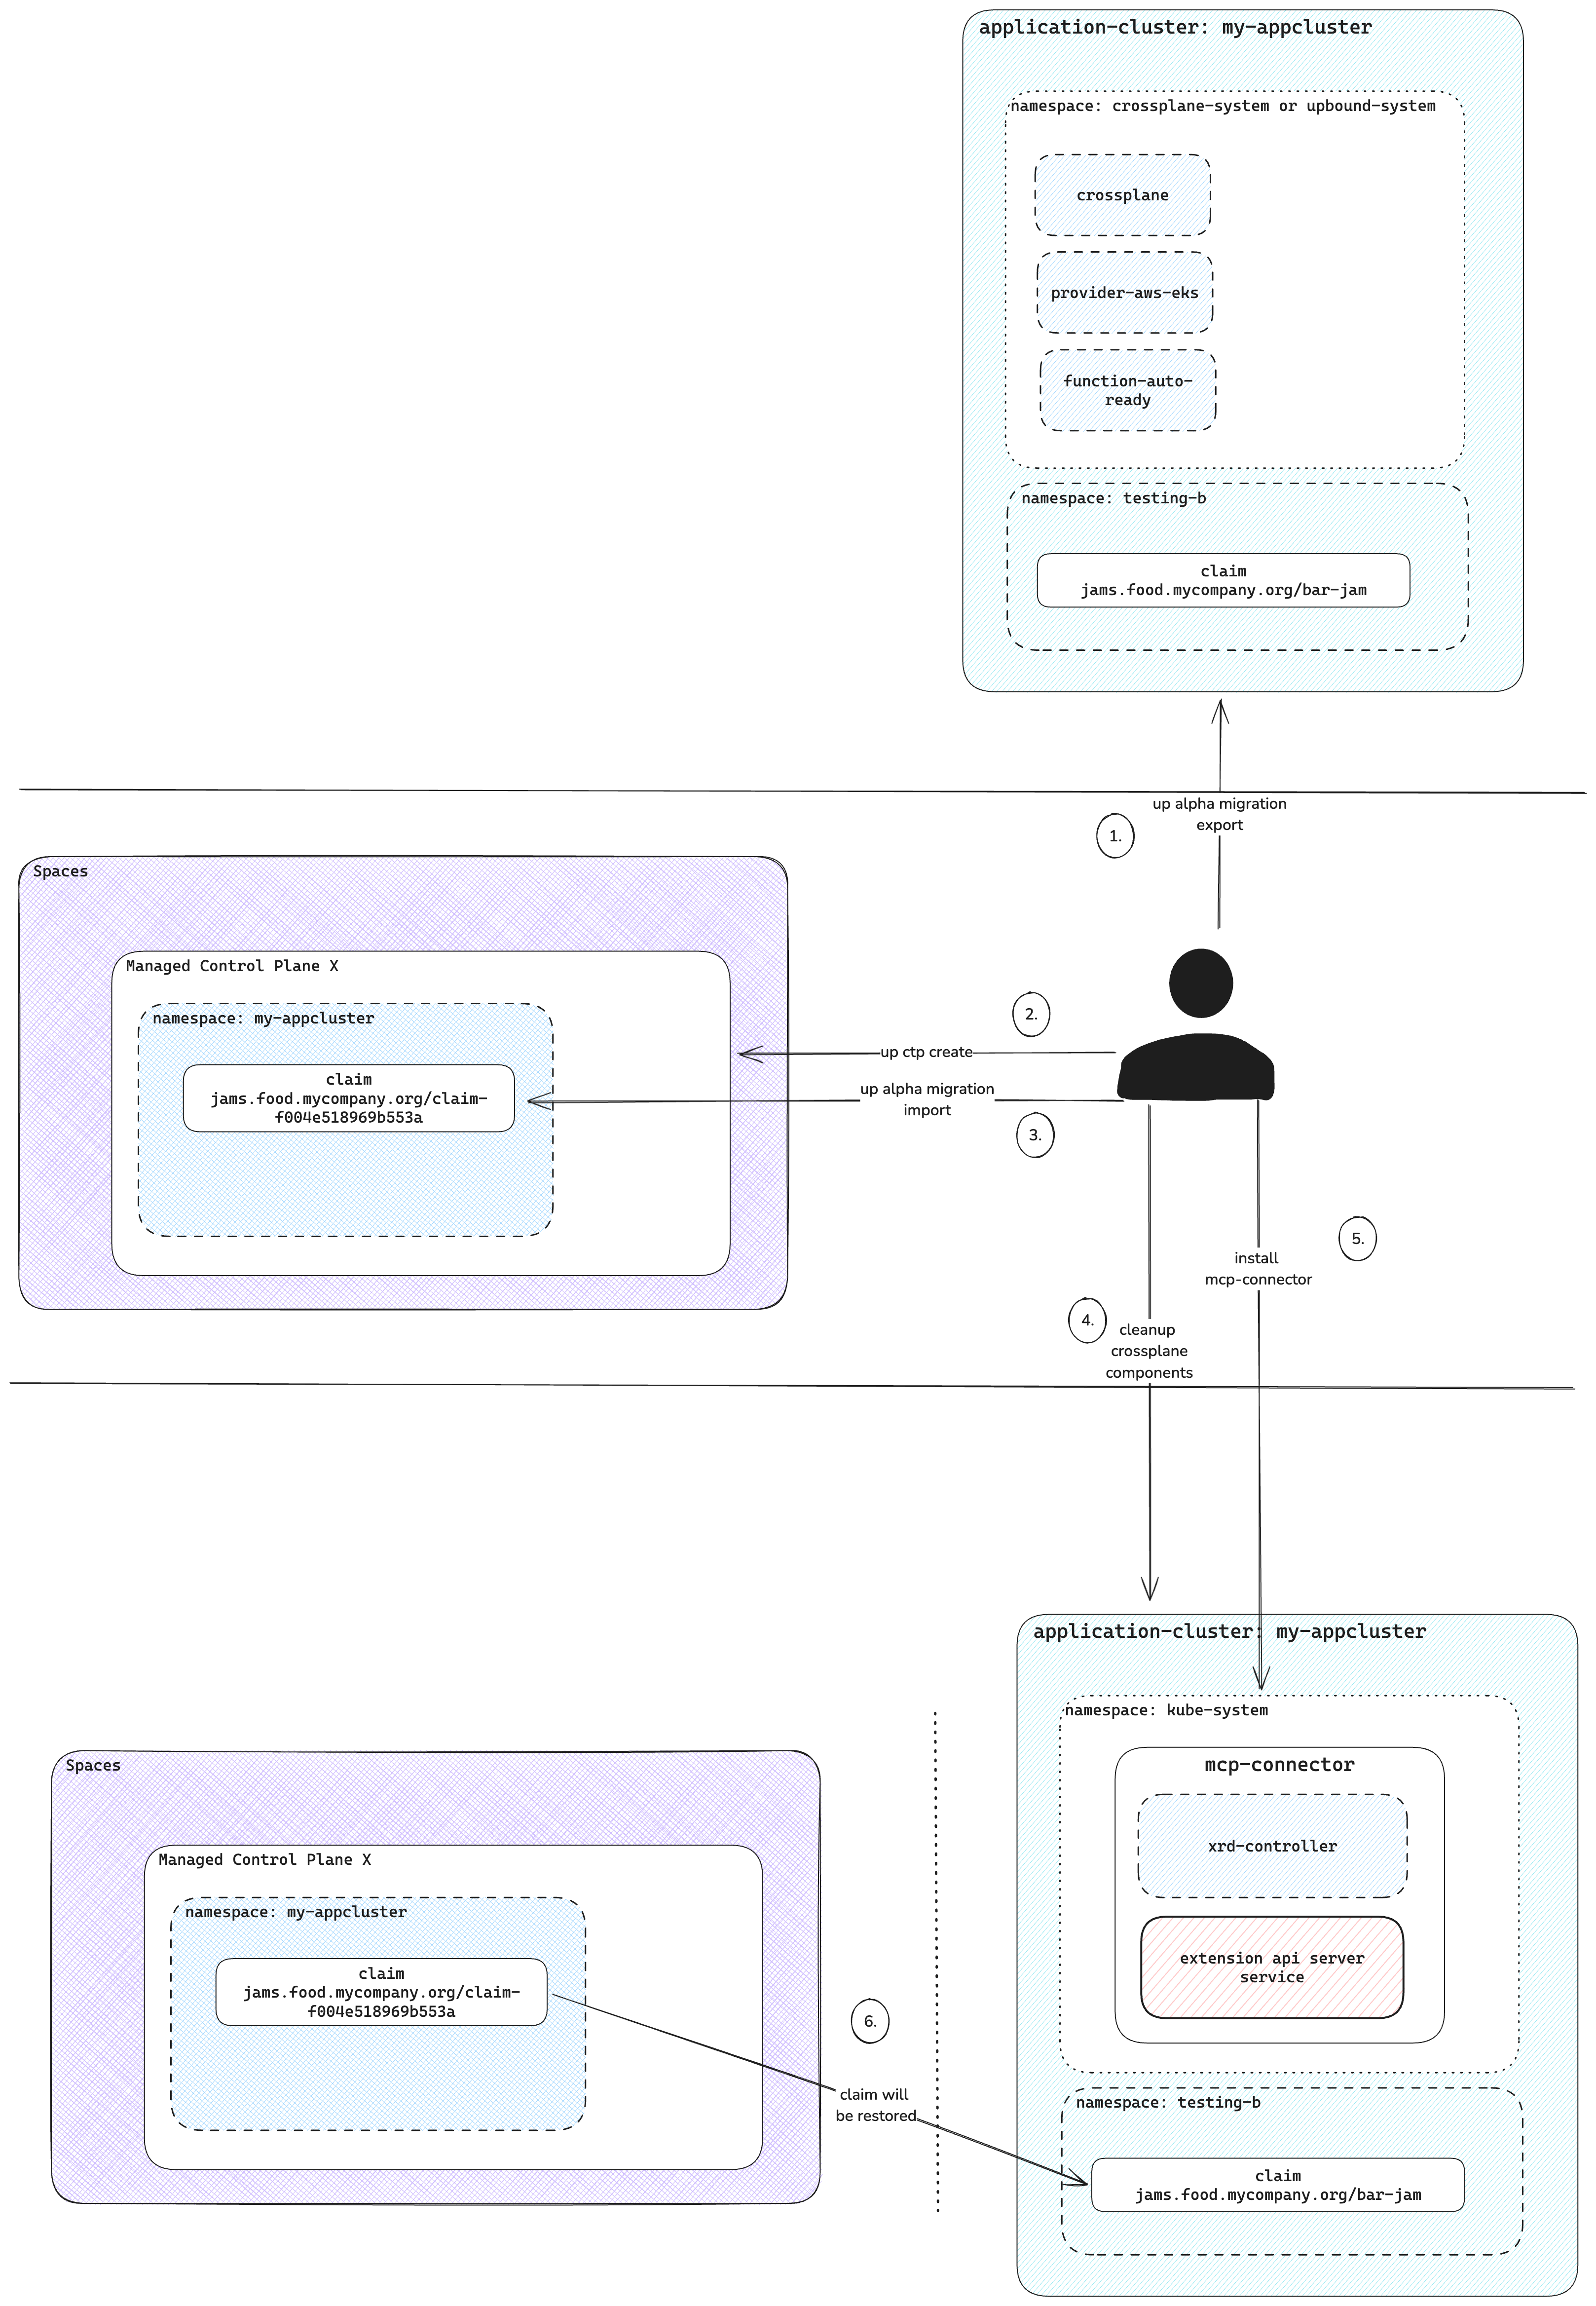
Export all resources
Before proceeding, ensure that you have set the correct kubecontext for your application cluster.
up controlplane migration export --pause-before-export --output=my-export.tar.gz --yes
This command performs the following:
- Pauses all claim, composite, and managed resources before export.
- Scans the control plane for resource types.
- Exports Crossplane and native resources.
- Archives the exported state into
my-export.tar.gz.
Example output:
Exporting control plane state...
  ✓   Pausing all claim resources before export... 1 resources paused! ⏸️
  ✓   Pausing all composite resources before export... 7 resources paused! ⏸️
  ✓   Pausing all managed resources before export... 34 resources paused! ⏸️
  ✓   Scanning control plane for types to export... 231 types found! 👀
  ✓   Exporting 231 Crossplane resources...125 resources exported! 📤
  ✓   Exporting 3 native resources...19 resources exported! 📤                                                                 ✓   Archiving exported state... archived to "my-export.tar.gz"! 📦

Successfully exported control plane state!
Import all resources�
The system restores the target control plane with the exported resources, which serves as the destination for the Control Plane Connector.
Log into Upbound and select the correct context:
up login
up ctx
up ctp create ctp-a
Output:
ctp-a created
Verify that the Crossplane version on both the application cluster and the new managed control plane matches the core Crossplane version.
Use the following command to import the resources:
up controlplane migration import -i my-export.tar.gz \
 --unpause-after-import \
 --mcp-connector-cluster-id=my-appcluster \
 --mcp-connector-claim-namespace=my-appcluster
This command:
- Note:
--mcp-connector-cluster-idneeds to be unique per application cluster - Note:
--mcp-connector-claim-namespaceis the namespace the system creates during the import - Restores base resources
- Waits for XRDs and packages to establish
- Imports Claims, XRs resources
- Finalizes the import and resumes managed resources
Example output:
Importing control plane state...
  ✓   Reading state from the archive... Done! 👀
  ✓   Importing base resources... 56 resources imported!📥
  ✓   Waiting for XRDs... Established! ⏳
  ✓   Waiting for Packages... Installed and Healthy! ⏳
  ✓   Importing remaining resources... 88 resources imported! 📥
  ✓   Finalizing import... Done! 🎉
  ✓   Unpausing managed resources ... Done! ▶️

fully imported control plane state!
Verify Imported Claims
The Control Plane Connector renames all claims and adds additional labels to them.
kubectl get claim -A
Example output:
NAMESPACE       NAME                                                        SYNCED   READY   CONNECTION-SECRET             AGE
my-appcluster   cluster.aws.platformref.upbound.io/claim-e708ff592b974f51   True     True    platform-ref-aws-kubeconfig   3m17s
Inspect the labels:
kubectl get -n my-appcluster cluster.aws.platformref.upbound.io/claim-e708ff592b974f51 -o yaml | yq .metadata.labels
Example output:
mcp-connector.upbound.io/app-cluster: my-appcluster
mcp-connector.upbound.io/app-namespace: default
mcp-connector.upbound.io/app-resource-name: example
Cleanup the app cluster
Remove all Crossplane-related resources from the application cluster, including:
- Managed Resources
- Claims
- Compositions
- XRDs
- Packages (Functions, Configurations, Providers)
- Crossplane and all associated CRDs
Install Control Plane Connector
Follow the preceding installation guide and configure the connector-values.yaml:
# NOTE: clusterID needs to match --mcp-connector-cluster-id used in the import on the managed control Plane
clusterID: my-appcluster
upbound:
  account: <ORG_ACCOUNT>
  token: <PERSONAL_ACCESS_TOKEN>

spaces:
  host: "<Upbound Space Region>"
  insecureSkipTLSVerify: true
  controlPlane:
    name: <CONTROL_PLANE_NAME>
    group: <CONTROL_PLANE_GROUP>
    # NOTE: This is the --mcp-connector-claim-namespace used during the import to the control plane
    claimNamespace: <NAMESPACE_TO_SYNC_TO>
Once the Control Plane Connector installs, verify that resources exist in the application cluster:
kubectl api-resources | grep platform
Example output:
awslbcontrollers                                 aws.platform.upbound.io/v1alpha1       true         AWSLBController
podidentities                                    aws.platform.upbound.io/v1alpha1       true         PodIdentity
sqlinstances                                     aws.platform.upbound.io/v1alpha1       true         SQLInstance
clusters                                         aws.platformref.upbound.io/v1alpha1    true         Cluster
osss                                             observe.platform.upbound.io/v1alpha1   true         Oss
apps                                             platform.upbound.io/v1alpha1           true         App
Restore claims from the control plane to the application cluster:
kubectl get claim -A
Example output:
NAMESPACE   NAME                                              SYNCED   READY   CONNECTION-SECRET             AGE
default     cluster.aws.platformref.upbound.io/example        True     True    platform-ref-aws-kubeconfig   127m
With this guide, you migrated your Crossplane installation to Upbound-control planes. This ensures seamless integration with your application cluster using the Control Plane Connector.
Connect multiple app clusters to a control plane
Claims are store in a unique namespace in the Upbound control plane. Every cluster creates a new control plane namespace.
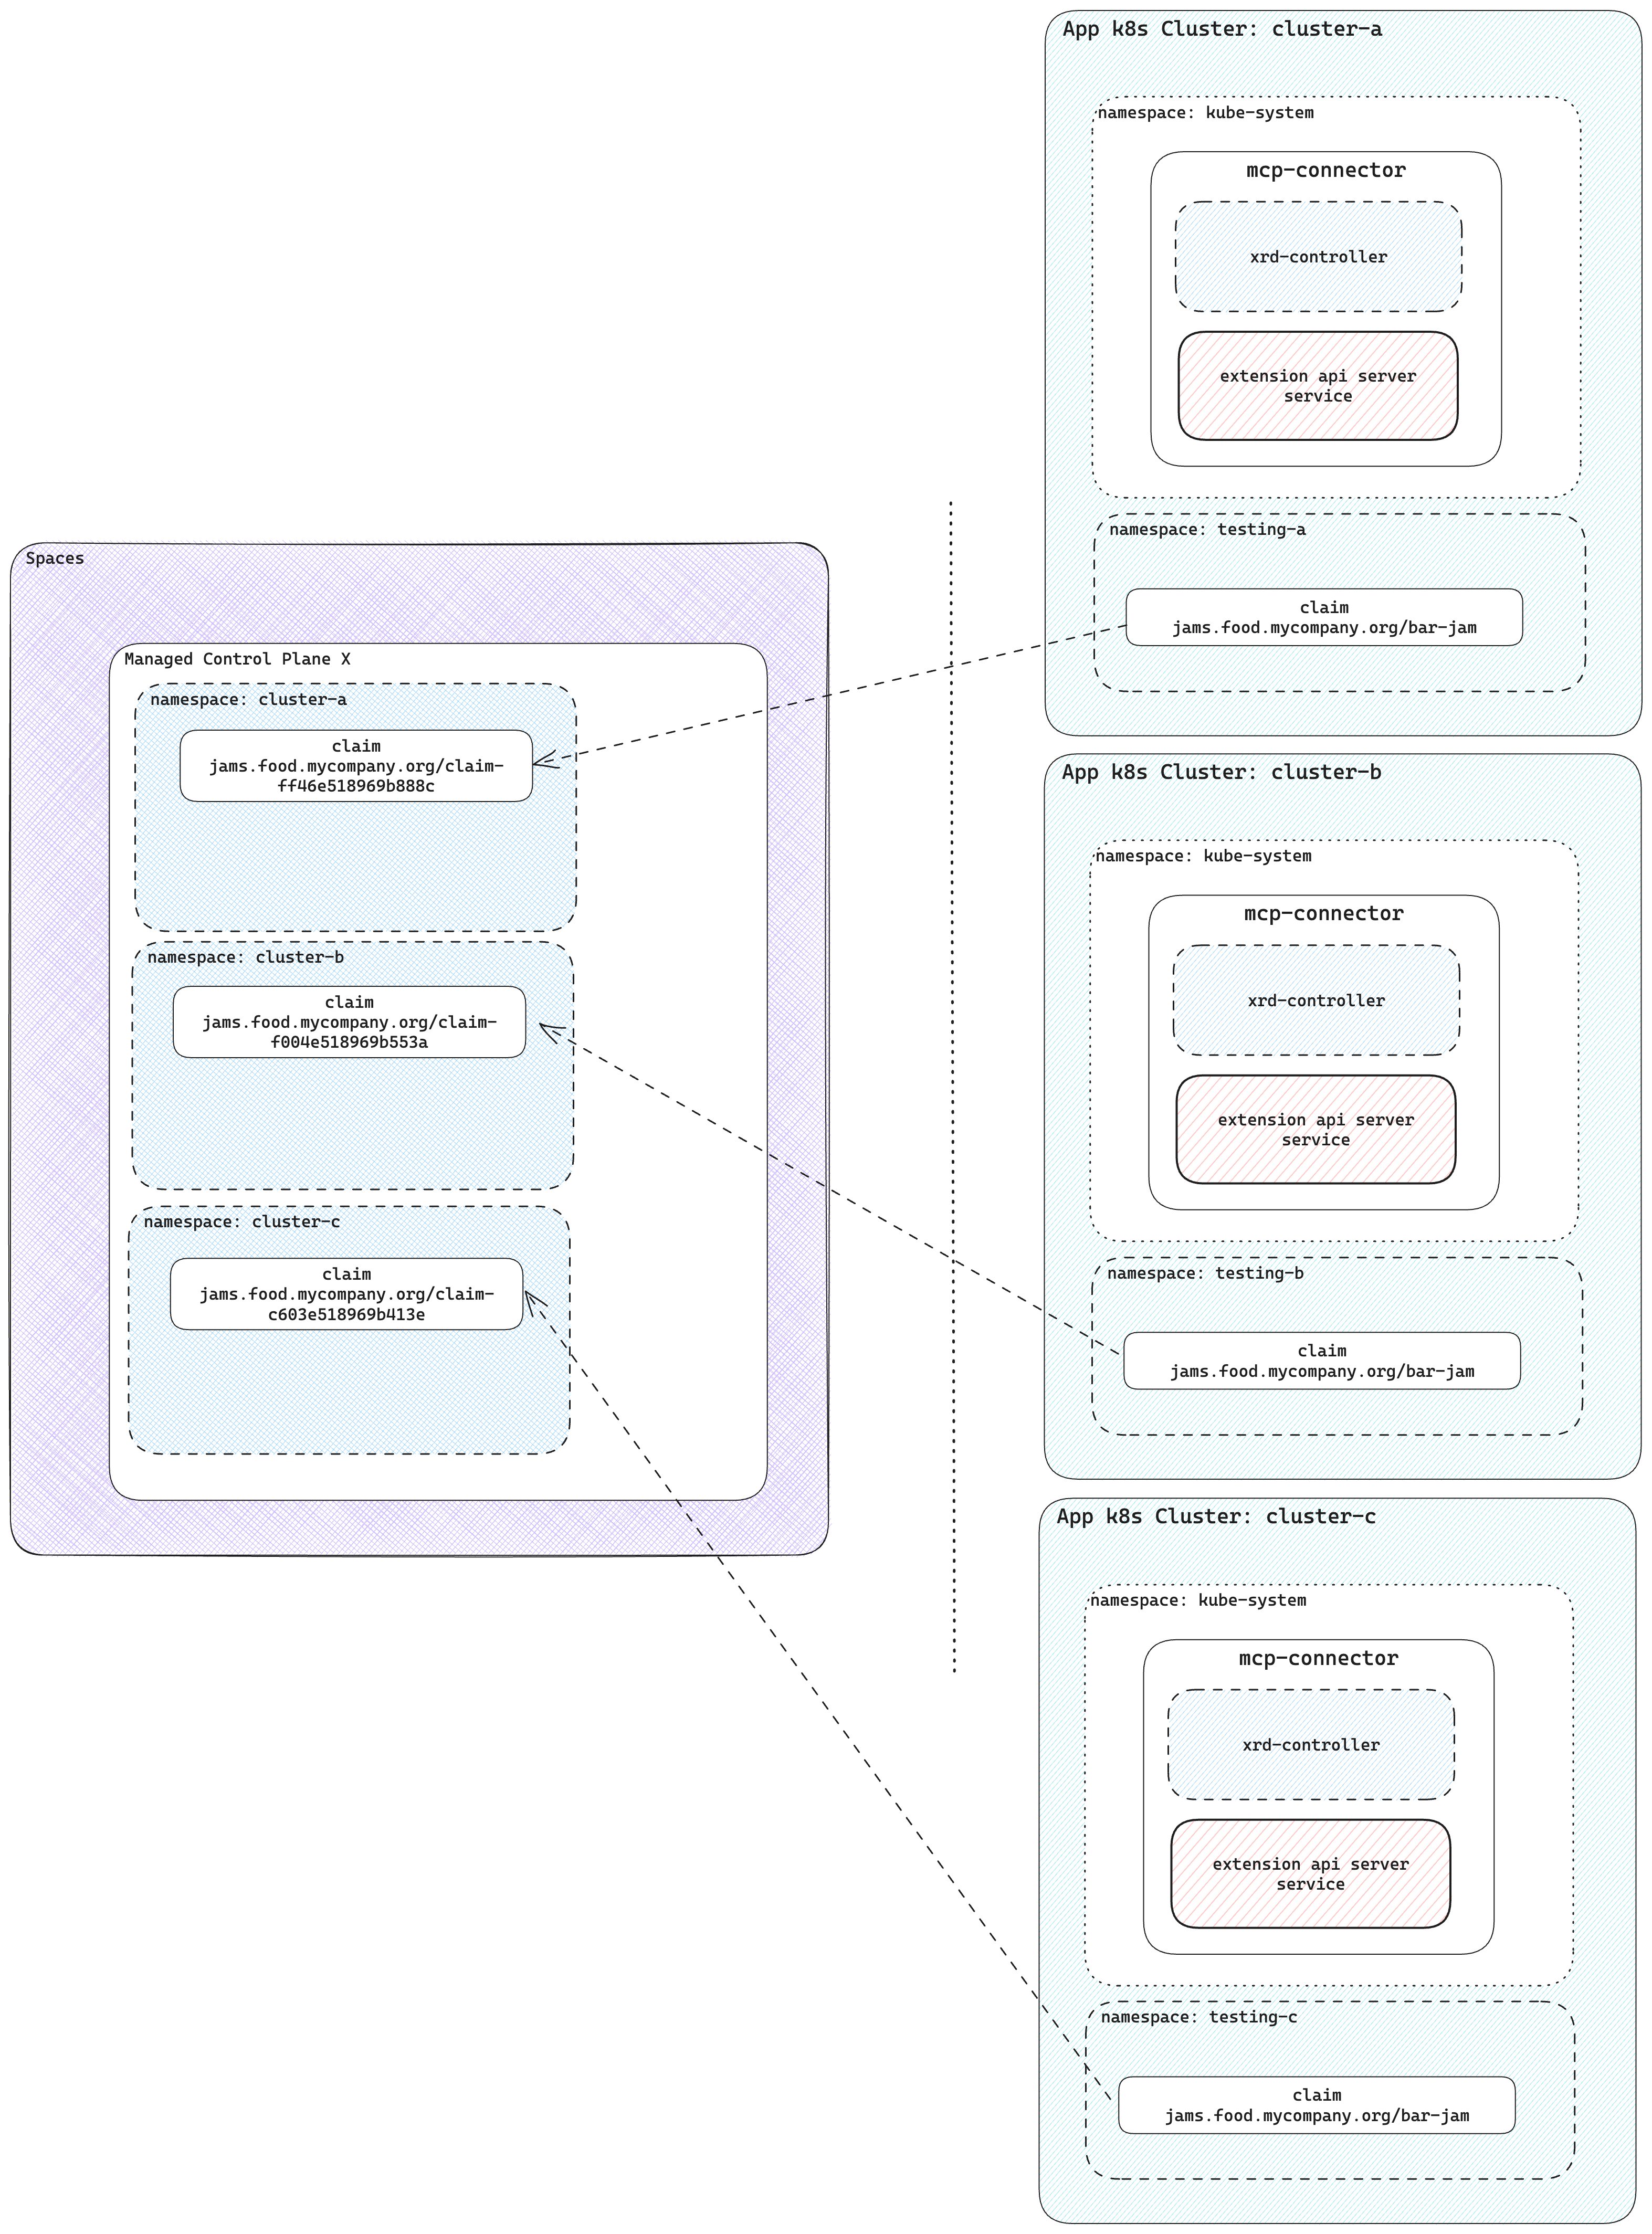
There's no limit on the number of clusters connected to a single control plane. Control plane operators can see all their infrastructure in a central control plane.
Without using control planes and Control Plane Connector, users have to install Crossplane and providers for cluster. Each cluster requires configuration for providers with necessary credentials. With a single control plane where multiple clusters connected through Upbound tokens, you don't need to give out any cloud credentials to the clusters.